When you hear about bleeding from the brakes, do you know exactly what it is? Being in charge in an auto repair shop most likely, yes! However, the topic may still be somewhat unknown to your most inexperienced employees or vehicle owners. In this article, we read about How to bleed brakes?
Bleeding is the process of removing the confined air from the interior of the brake system, an essential procedure for the conservation of the braking components. Thus, it must be done whenever the brake fluid is replaced to prevent problems such as corrosion and accelerated deterioration of the parts that make up the braking system.
In this post, check out our step-by-step instructions to efficiently perform this essential procedure! Don’t miss these tips!
Bleeding the brakes in 7 steps
Your customers must see bleeding as a necessary procedure, so much so that the overall recommendation, as mentioned above, is to bleed whenever there is a replacement of the brake fluid.
Guidelines on how often to change this fluid vary according to the assembler and vehicle model. Thus, you must maintain a trusting relationship with your customer regarding this maintenance process. In this way, change the fluid every two or three years, let the bleeding take place!
1. Raise the car and remove the tires to bleed brakes
It is strictly recommended that the car be suspended for bleeding during all stages. Therefore, use a lifting platform or trestles to position the vehicle properly. With the car broken, remove the tires.
2. Locate the bleed screws
Remember: you must handle this screw very carefully, avoiding causing any damage that makes maintenance impossible. The ideal wrenches for driving these screws are the purge wrenches.
Try to dry and loosen them gently. Noticing a lot of resistance, stop applying force! Stop, disperse some lubricating oil around the bolt and try again. Once the opening is done, you can screw them in again, carefully.
3. Find and assess the fluid level in the hydraulic reservoir
It’s not hard to find him. Just look for a clear pool near the master cylinder of the brake. Translucent coloration facilitates fluid-level analysis. Therefore, if necessary, fill it in until the indicated mark.
You must follow the assembler’s recommendation, expressed in the vehicle manual, advising on using the most suitable fluid for the model in question. The variety of options on the market is large, but the assembler’s specification must be respected, aiming to preserve the vehicle as designed.
4. Lubricate the brakes in the proper order to bleed brakes
There is an ideal sequence for lubricating the brakes. It is usually recommended to start with the brake that is furthest away from the master cylinder. However, as with the fluid recommendation, follow the automaker’s guidance, likely expressed in the car’s manual.
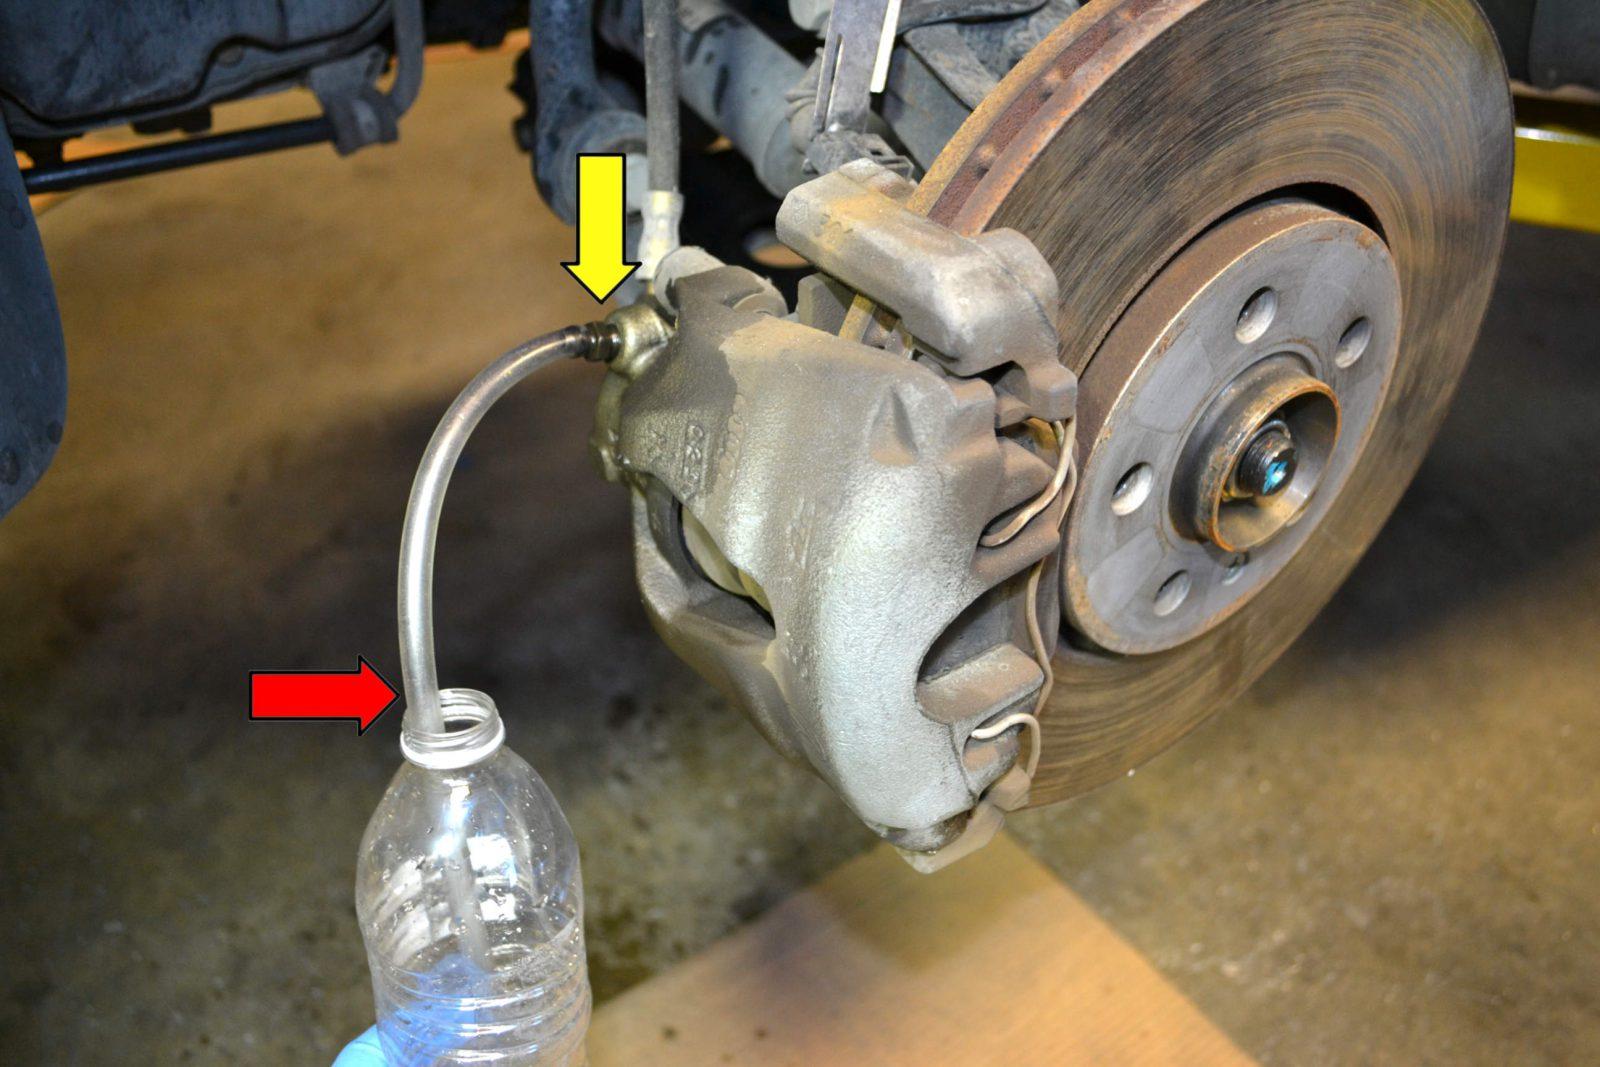
5. Positioning the bottle and tube
Now you’ll need a bottle — 2-liter PETs work just fine — and a thin tube. Then place one end of the line on the bleed screw and the other end on the inside of the bottle. A good tip to prevent the return of air to the system is to hold the bottle higher than the brake calipers, preventing the return of air.
6. Count on a helping hand to bleed brakes
First, we emphasize the importance of the engine is turned off, avoiding burns during the procedure. In addition, from this stage on, the collaboration of an employee/auxiliary is required. So, follow this cycle:
- instruct your assistant to repeatedly step on the brake pedal, warning you when you feel resistance from the pedal. He also needs to be oriented to advise when pedal feedback is optimal;
- subtly loosen the bleed screw, keeping the auxiliary’s foot on the pedal. You will notice the fluid transit through the tube. Inside the car, the pedal will progressively sink;
- Quickly tighten the bleed screw as soon as your assistant tells you that the pedal has touched the hold;
- check the fluid level in the reservoir and, if necessary, fill it to the indication.
7. Repeating the process
Now it’s time to repeat the entire procedure from the previous step at least five times, ensuring that there are no air bubbles whenever the fluid passes through the tube. Also, remember that you’ve just bled one brake, leaving another three where you’ll repeat these procedures.
After completing the steps, in all brakes, be sure to re-tighten and re-tighten the bleed screws carefully and proceed with the reinstallation of the wheels and their screws.
Only at the end of the entire procedure will you be able to lower the carriage off the platform — or any other tool you used to lift it.
Extra tips
- Some cars have a hydro vacuum system, but this does not influence the procedure, which must still be done with the engine off. However, for the pedal to show resistance again, it is necessary to start the car.
- After bleeding, noticing looseness in the pedal, analyze the hydraulic system again, as some components with accentuated wear may be causing this.
- Do not mix the old and dirty fluid with the new one, do the entire bleeding procedure with only “zero” oil circulation.
- Be careful when handling brake fluid. If it gets on the paint, it will damage it and possibly the bodywork as well.
- Always use the oil recommended by the vehicle manufacturer, indicated in the manual.
- In case of accidents with the fluid, immediately apply plenty of water.
In addition, we emphasize that the use of new fluid in bleeding is essential, as this fluid loses part of its lubricating properties due to moisture during exposure to the environment. So, the process may seem a little laborious, but practice will make the process easy.
In time, instruct your assistant to notice if there is a spongy feeling in the pedal. If he senses that when pressing is clearing, you will need to bleed the brakes again until there are no air bubbles inside the tubes.
Also read: iPhone 11 Price in Pakistan